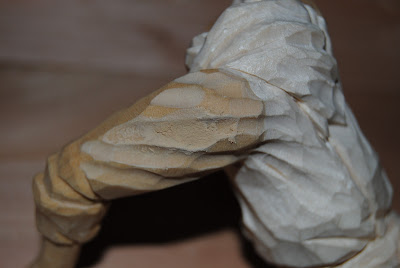
As you can see, I have carved the shoulder area to a rough
shape. Take note of how the shoulders
are slightly forward. This is due to the
fact than when one supports his body weight with his arms in a reclined
position such as the position that my caricature will be in, the shoulders are
pushed forward. I want this fellow to
look relaxed, but also have the correct posture for the position that he will
be assuming. You can also see that I
have roughed out the bandana and drilled a hole that will accept the neck post
of the guy’s head.
Two problems arose as I carved the arms. Here’s a photograph of the first.
This is something that happens often when carving
attachments. Sometimes you may misjudge
the depth that the dowel should be when joining the pieces together. This is exactly what happened in this
case. The dowel went too deep and poked
out through the other side when I carved down to the level of the
shoulder. If this ever happens, don’t
panic. Just keep on carving as if it
wasn’t there. You’ll see as the carving
is finished, and especially when the figure is painted, that this dowel head
will disappear completely. The next
photo shows the second and related problem that I ran into as I carved the
other arm.
The cause of this hole was the same one that gave rise to
the dowel showing through on the opposite shoulder. Here, however, the hole is exposed and not
filled by the dowel. What do you do when
you are faced with a dilemma such as this big, gaping hole? Do you throw it out and carve another? Of course not. For now, I will simply not worry about it and
continue carving the arms until they are fully detailed. Once the arm is completely carved, I’ll show
you the best solution.
I decided to put the body aside for a while and work on
carving the head for my figure. I wanted
to catch the proper expression on this cowpoke’s face, one that would show the
pleasure that he would be feeling soaking his aching feet in a cool stream on a
warm, sunny afternoon. I decided to
carve the eyes closed, and to add some interest, I carved a lock of hair
sweeping down over one eye. Here’s a
look at how the face turned out.
The photograph above shows the test fit of the head to the
body. I have started detailing the
bandana at this point and have the body and arms almost complete. You can see that the head sits up too high,
giving the figure a giraffe neck. I’ll
carve away material from the neck area as well as the bandana until the head
sets down at the proper position. You
can also see in this picture where the end of the dowel has been carved away as
part of the shoulder. Now, the only
thing that makes it noticeable is the fact that it is a different color than
the rest of the body. This will completely
disappear once he gets his colors.
Here is a picture of the other shoulder, the one that has
the hole where a hole shouldn’t be. You
can see that I have gone ahead and carved in the folds in the sleeves and this
is what I was left with. So, what do you
do to cover a mistake as big as this one?
Well, they don’t make wood putty for nothin’! Using a little wood filler, I squeeze out a
bit onto my finger and press it into the hole and smooth it into the crease of
the sleeve.
Once the filler sets up and is completely dry, I simply sand
it down smooth. When you make this kind
of repair using wood filler, you do have to realize that the filler will not
accept paint the same as the rest of the wood.
When you paint with thin washes of acrylics like I do, you have to take
this into account when you apply the colors.
Since this repair is in the bottom of a fold of clothing, it shouldn’t
be too hard to disguise. Once the figure
is complete, you will be hard pressed to find the repair. Just wait and see.
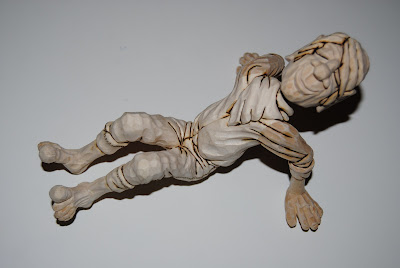
The following are a few photographs of the completed
figure. I have added some accent lines
with my wood burner as well as division lines that will help to separate
different colors when I paint, without bleeding into each other.
With my figure complete, it’s time to move onto the
landscape that this fellow will go into.
In the next post, I’ll walk you through my decision making process as
well as fill you in on the mechanics of completing the landscape.
I hope that you are enjoying your journey along with me on
this project. Sometimes I feel like I’m
making every possible mistake with this one, but maybe it’s meant to be that
way so that you will know what to do when you are faced with similar
challenges. Please leave me a comment,
or drop me an email. I would love to
know if you have any questions or other ideas of how better to solve carving
problems. Thank you for following along,
and for all the support that you give to The Old Stump.


No comments:
Post a Comment