Monday, January 23, 2012

The Caterpillar Knife

This little beauty has been raising eyebrows all weekend.  It's the latest experiment to come out of my shop, and I must say, it turned out even better than I could have imagined.  I just love the way the different layers of the lamitation play off of each other and the way the handle grooves create, not only impelling patterns, but give the knife a superior grip.  No one is going to drop this knife, not even with the sweatiest of palms.  I have affectionately dubbed this one the Caterpillar since my sweet wife said that that is what it looks like and I have to agree with her.  This little gem sold within twenty minutes of posting it.  That's certainly a new record in my book.


I hope you like it and I am currently taking custom orders for $40.00 in any blade shape and length that you would like.  Just send me an email with at theoldstump@live.com with your order and I'll get back to you.

Saturday, January 21, 2012

The Painted Figure

It's been very difficult lately to find the time to work on my Cooling His Heels project.  I did, however, find the time to paint my cowboy figure.  He turned out quite nicely.  Simple, yet endearing.  I chose a simple color scheme of thin acrylic washes to paint him.  Since this fellows toes are to be a major focal point of the piece, I highlighted them by painting them with a darker red than the rest of the feet.  Here are a few photos of the results.


I hope to find some time tomorrow to work on filling out the scene with add-ons.  I'll keep you updated on my progress.

Thursday, January 12, 2012

Landscaping 101

The journey of the “Cooling His Heels” project marches forward.  While ideas of add-ons and details continue to parade through my mind like a marching band, I thought I would let those ideas solidify for awhile as I focused my attention on crafting the scene that would be the new home for my cowboy.  It would have to be something that would not only showcase the figure, but a landscape that that would capture the mood of the message that I am trying to portray.
The first decision that I was faced with was the overall shape of the scene.  I enjoy landscaping in the real world, and I truly love curved lines as opposed to sharp corners.  I sat my figure on a piece of paper and envisioned where he would sit, where the stream would run and location of the other features that I wanted to include.  I decided that a circular scene would be the best shape to portray the serene feeling that I was seeking, and ten inches was the perfect diameter for the circle.

I made a trip out to my workshop and found a piece of 3/4" MDF (medium density fiberboard) that was the perfect size.  I cut a ten inch diameter circle out of the MDF using my circle cutting jig on my band saw and sanded it perfectly round using my circle sanding jig for my disk sander.  After placing my figure in the location that I wanted it, I traced in where the stream would go, making sure that the heels of the cowboy were in the right spot.

With the stream located, I used a router with a straight cutting bit to remove the wood for the stream, going roughly half way through the base.  Once the stream was routed, I positioned my figure once again and cut two more pieced of MDF out of the scraps that I would use to form a small hill that the caricature would be reclining on.  Using wood screws, I attached the two additional layers on the scene.  Once everything was positioned and attached, I used my rotary tool with a small sanding drum to round off the sharp edges and give some contour and definition to the landscape.  The following photographs show the progress at this point.


As you can see in the photo above, the rear end of my figure does not quite reach the bottom of the base.  This was by design.  If I were to relax on the bank of a stream with my feet in the water, I would want to be sitting on something comfortable.  Therefore, I provided him a nice log to sit on that cantilevers over the edge of the stream, adding to the effect.  Here’s what I came up with.

Now, with the bones of the scene in place, it was time to make it look more realistic.  Using auto body putty, I filled in the edges around the log to make it look as if it were sunk into the mud.  I also used the body putty to elevate the level of the ground where the figures hands would make contact, since it was slightly too low.  I also spread the putty around at the edge of the bank in front of the log to simulate the texture of mud.  The following is a picture of the scene after this step.

Since the bottom of a stream is not often smooth, I chose to add some texture to it.  Using Mod Podge as a binding agent, I applied course, granular sand that I had purchased years ago from my local hobby store.  Here’s the scene after the stream had been textured.

I was really starting to like the direction that this piece was going.  I got so excited in fact, that I neglected to take any more photographs of the progress of the landscape.  Here are a couple of pictures of the finished landscape, with a verbal description of the process to follow.


The sandy beach behind the hill was textured using salt.  I know it was a strange idea, but it worked out even better than I could have imagined.  The hill was formed by using model railroad grass that I purchased some time ago from an online source, and the bushes were formed using a similar material.  I brought color to the landscape using multiple layers of different shades of colors to build up the effect.

I am more than please with the final results and am getting very excited with the progress made.  I am also energized and ready to start filling in the scene with details and add-ons.  The final photographs show the finished landscape with the cowboy in his position. 


I just love the way his toes overhang the edge of the bank.  He looks so relaxed and happy to be soaking up the cool water and the warm sun.  I simply can’t wait to get this fellow painted and the scene filled in.  The next step will be to paint the figure and attach him permanently to his new home.

Saturday, January 7, 2012

Finishing the Figure

In this post, I finish carving the figure for my “Cooling His Heels” scene.  We’ll discuss how I finished the body and overcame some problems that arose as I carved it, as well as how I finished the head of my cowboy.


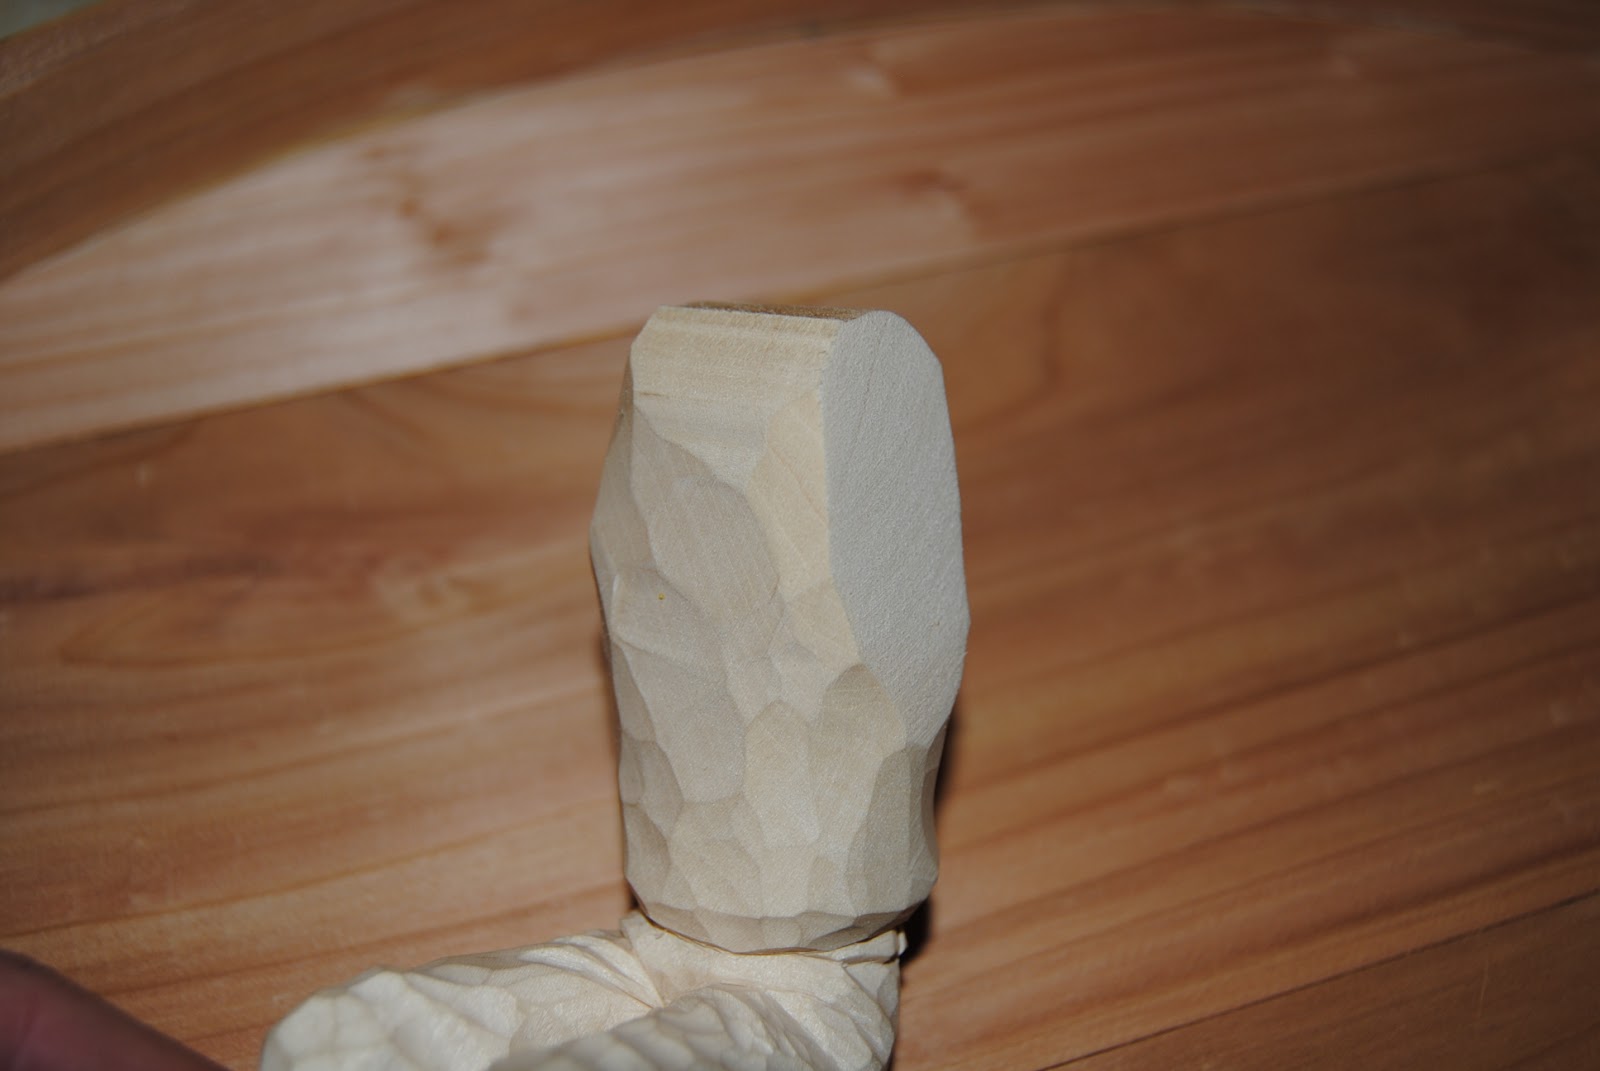
As you can see, I have carved the shoulder area to a rough shape.  Take note of how the shoulders are slightly forward.  This is due to the fact than when one supports his body weight with his arms in a reclined position such as the position that my caricature will be in, the shoulders are pushed forward.  I want this fellow to look relaxed, but also have the correct posture for the position that he will be assuming.  You can also see that I have roughed out the bandana and drilled a hole that will accept the neck post of the guy’s head.

Two problems arose as I carved the arms.  Here’s a photograph of the first.

This is something that happens often when carving attachments.  Sometimes you may misjudge the depth that the dowel should be when joining the pieces together.  This is exactly what happened in this case.  The dowel went too deep and poked out through the other side when I carved down to the level of the shoulder.  If this ever happens, don’t panic.  Just keep on carving as if it wasn’t there.  You’ll see as the carving is finished, and especially when the figure is painted, that this dowel head will disappear completely.  The next photo shows the second and related problem that I ran into as I carved the other arm.

The cause of this hole was the same one that gave rise to the dowel showing through on the opposite shoulder.  Here, however, the hole is exposed and not filled by the dowel.  What do you do when you are faced with a dilemma such as this big, gaping hole?  Do you throw it out and carve another?  Of course not.  For now, I will simply not worry about it and continue carving the arms until they are fully detailed.  Once the arm is completely carved, I’ll show you the best solution.

I decided to put the body aside for a while and work on carving the head for my figure.  I wanted to catch the proper expression on this cowpoke’s face, one that would show the pleasure that he would be feeling soaking his aching feet in a cool stream on a warm, sunny afternoon.  I decided to carve the eyes closed, and to add some interest, I carved a lock of hair sweeping down over one eye.  Here’s a look at how the face turned out.


The photograph above shows the test fit of the head to the body.  I have started detailing the bandana at this point and have the body and arms almost complete.  You can see that the head sits up too high, giving the figure a giraffe neck.  I’ll carve away material from the neck area as well as the bandana until the head sets down at the proper position.  You can also see in this picture where the end of the dowel has been carved away as part of the shoulder.  Now, the only thing that makes it noticeable is the fact that it is a different color than the rest of the body.  This will completely disappear once he gets his colors.

Here is a picture of the other shoulder, the one that has the hole where a hole shouldn’t be.  You can see that I have gone ahead and carved in the folds in the sleeves and this is what I was left with.  So, what do you do to cover a mistake as big as this one?  Well, they don’t make wood putty for nothin’!  Using a little wood filler, I squeeze out a bit onto my finger and press it into the hole and smooth it into the crease of the sleeve.

Once the filler sets up and is completely dry, I simply sand it down smooth.  When you make this kind of repair using wood filler, you do have to realize that the filler will not accept paint the same as the rest of the wood.  When you paint with thin washes of acrylics like I do, you have to take this into account when you apply the colors.  Since this repair is in the bottom of a fold of clothing, it shouldn’t be too hard to disguise.  Once the figure is complete, you will be hard pressed to find the repair.  Just wait and see.

The following are a few photographs of the completed figure.  I have added some accent lines with my wood burner as well as division lines that will help to separate different colors when I paint, without bleeding into each other. 


With my figure complete, it’s time to move onto the landscape that this fellow will go into.  In the next post, I’ll walk you through my decision making process as well as fill you in on the mechanics of completing the landscape.

I hope that you are enjoying your journey along with me on this project.  Sometimes I feel like I’m making every possible mistake with this one, but maybe it’s meant to be that way so that you will know what to do when you are faced with similar challenges.  Please leave me a comment, or drop me an email.  I would love to know if you have any questions or other ideas of how better to solve carving problems.  Thank you for following along, and for all the support that you give to The Old Stump.

Thursday, January 5, 2012

Attaching the Arms

We last left of having detailed the hands and roughed out the upper portion of the arms.  In this post, I will show you how I attached the arms to the body.  Here are some photos of where we left off with my last post.


To begin with, we need to have a perfectly flat plane on both the arms and on the torso in order to get a seamless bond between them and attach them together without them looking “attached”.  After a trip out to my shop and a few moments on the disk sander, here is where I was at.


You can see from the photos that the areas that will be glued together are indeed flat and ready to be attached.  This is the little gizmo that I invented for lining up attachments in the right location.  I have blogged about it before, so feel free to browse through the previous posts for a complete explanation.


With my pins pushed into the arms where the dowels will eventually go, it’s time to fit them to the torso in just the right location.  Here’s a photo with the arms placed in the right spot.


The above photograph shows the arms and torso with the pins removed.  Notice the holes left behind by my positioning pins.  That’s exactly where I need to drill my dowel holes.  The following are a few photos after 1/8” dowels have been fitted into the holes.


Now, I will fill the holes in with some quality wood glue, I use Tightbond II, reinsert the dowels, and spread a thin layer over the joining surfaces.  Once glued, I will wrap some rubber bands around the arms and body to clamp them in place until the glue sets up.  In the next post, we will finish detailing the arms and maybe get the head done.  I hope you are enjoying following along with me.