Monday, December 24, 2012

Merry Christmas from The Old Stump


May your heart be filled to overflowing with joy and Christmas cheer as you celebrate this most wondrous of occasions with your family and friends.  May the peace that only the Savior offers permeate every fiber of your being and bring hope to your souls.

Merry Christmas from The Old Stump!

Monday, December 10, 2012

Custom Palm Tools Page

I have added a new Custom Palm Tools page to The Old Stump for placing a custom order.  I have made it possible to select any handle material, ferrule patina and blade size and sweep for a truly custom tool.  Please stop by for a visit.  I would appreciate any feedback that you would be willing to share.  I would also be happy to answer any questions that you may have at theoldstump@live.com .  Thanks for stopping by.

Carving the Caricature Face Part 2

Part 2 of the Carving the Caricature Face Tutorial is now available for download.  In the first part of the tutorial we worked on roughing out the head and detailing the nose.  In the second part, we work on the mouth and lower half of the face.
 
Follow the Tutorials Tab located at the top of this page and scroll to the bottom of that page until you find the link.  I recommend that you download the PDF file to your computer for ease of use and because viewing it on line cans cause the photos appear a bit fuzzy.  I hope that you enjoy it and find it educational.


Tuesday, November 27, 2012

Now Accepting Custom Palm Tool Orders

Well, I'm all tooled up and excited to start accepting custom orders for my line of palm tools.  I have also added 1/2" tools to the line to expand from the 1/4" and 3/8" tools.  3/4" tools are in the very near future and V-tools are also on the list.  Visit the Palm Tool page and scroll to the bottom to place your order.  I will accept special requests on handle material as long as the wood holds out.  Just send me a message during checkout or email me at theoldstump@live.com with your special request.  Thanks for stopping in.

New Tutorial

A few weeks ago, I put out the feelers to see if my followers were still interested in my tutorials.  I received a ton of emails with positive feedback asking me to keep making them.  The overwhelming response has spurred me on to start a new tutorial.  Many of the emails expressed how helpful the study stick tutorial had been and asked me to continue on with it.  Unfortunately, the study stick fell to an untimely demise, making it impossible for me to finish it up.  On a more positive note, this gives us a chance to start something new.

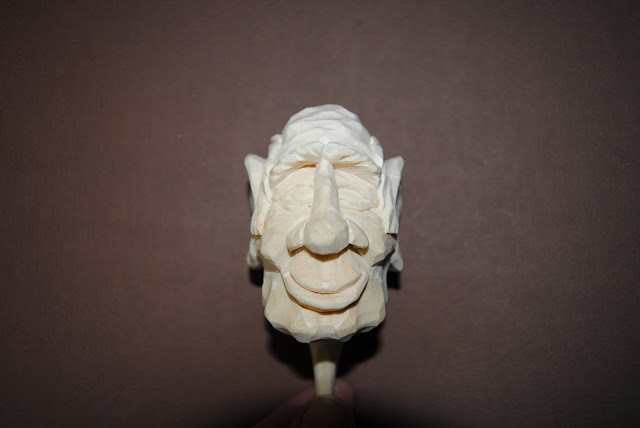
I decided to continue to help those who are struggling with facial features by carving an new face.  But, why stop there?  Let's carve the whole caricature head!  The first installment of the tutorial covers roughing out the head and caving the nose.  I hope you find it useful and informative.  Just click the Tutorials Page Tab at the top of this page and scroll down to the bottom.  There is a link that will take you to a PDF document that contains the tutorial.  Viewing it online can distort the images that are imbedded in the document, so for best viewing I suggest you download it to your computer's hard drive.  It also makes scrolling through the pages much smoother.  I hope you enjoy it.  Here's a sneak peek at what the end results will be:


Saturday, November 17, 2012

Not for Wood

I thought that I would try something a little more involved that the usual carving knife.  These knives were significantly more challenging, but were incredably fun to make.  Custom knives of this quality sell for hundreds of dollars from a number of custom manufacturers.  Maybe some day I'll get into that racket.

The first knife pictured here is a hunting/skinning knife made of O1 steel, O1 bolsters, brass handle pins and apricot wood handle scales.  The spine of the knife has file work of my own design and the edge is deeply hollow ground for an exceptionally sharp cutting edge.  I've held a lot of knives as you can imagine, but this knife just feels amazing.  It was well worth the time it took to make it.  I can't wait to give it a try in the field.


This next knife is a paring knife that I made for my sweet wife.  Also made of O1 steel, hollow ground blade, brass handle pins, and padauk wood handle scales.  I went with a nice satin finish on this little gem, which I really think adds to the overall look of the knife.  As you can see in the second picture, the tang is fully tapered and the bolsters are zero clearance.  The handle has a belly on the bottom as well as the sides for a wonderful grip and feel.  It's already seen work in the kitchen and cuts like nothing you can buy at the department store.  I already have plans to make my sweetheart a whole kitchen set.  I'll be sure to post pictures when the set is complete.


Thanks for taking time to look at my latest knife making adventures.  I have also just posted a handful of new carving knives if you would like to hop over to the Knife Gallery page.

Saturday, November 3, 2012

Palm Tool Gallery

Hi Folks!

If you look at the top of this page, you will find a new tab labeled "Palm Tool Gallery."  Since I've been making more and more palm tools, I thought it appropriate to give these flashy little chip makers their own page to hang out on.  I'm still not quite ready to accept custom orders for these gouges, but I will be in the very near future.  I hope you will stop in and take a quick look.  There are some really nice ones there who are waiting for a new home.

Christmas is coming!  Now is the time to place your order for custom carving knives for yourself or those on your Christmas list.  Get your orders in early to avoid delays.  We want no empty stockings on Christmas morning!

I would also like to thank all of those who have left comments and sent emails about me providing future tutorials.  Due to the overwhelming response, I will continue to post new ones periodically.  Hopefully after the holiday season is wrapped up, I'll find the time to continue with the study stick tutorial and cover how to carve the eyes.

Thanks for stopping by and Happy Carving!

Wednesday, October 24, 2012

Crunchy on the Outside, Chewy in the Middle

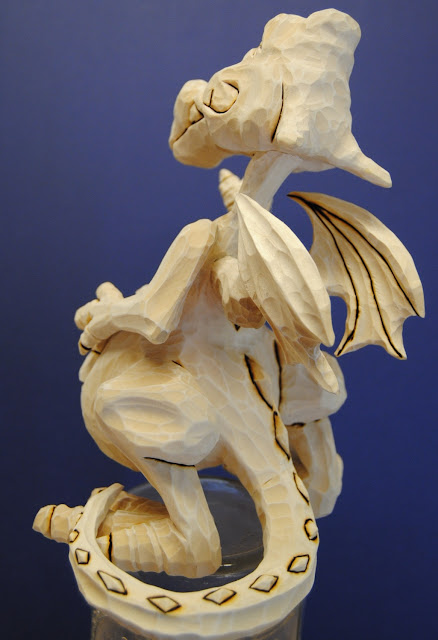
I finally got around to finishing up this piece.  I must say that this is one of my best carvings to date.  It turned out better than I could have imagined.  The carving itself was incredibly challenging and I had to develop a few new techniques in order to get the dragon the way that I wanted it.  I think the painting worked out quite well too.  I debated for some time on what color he would be and finally settled on green.  I'm very glad that I did.  I think it's the base that really sets the whole piece off.  The charred remains with the chunks of armor were a simple joy to create and really round out the entire composition.


I hope you like him.  There is a link on the Carvings Gallery Page to many more photos if you like to stop by and have a closer look.  Thanks for stopping by.

Saturday, September 22, 2012

A Round of #7's

I just finished up a batch of 1/4" and 3/8" #7 gouges.  I'm really starting to zero in on my methods of production.  I simply love working with the different woods and ferrule styles.  I think it gives each tool a uniqueness that is unparalleled, not to mention easy on the eyes.

All are available on the Knife Gallery Page for purchase.  The last two batches sold within 24 hours after making them available, so if one catches your eye, don't hesitate.  I hope you enjoy looking at them as much as I did making them.  Thanks for stopping by The Old Stump!


Friday, September 21, 2012

Any Interest in Tutorials?


In the past, I have had a fun and exciting time carving and producing a couple of tutorials including the Archer and the Study Stick.  I’m not sure if many people realize the time and effort it takes to publish something on this scale.  There are several carvers out there who record video of themselves carving and demonstrating how they do things.  I certainly do not discount the value of their contribution to the carving community.  I, myself, enjoy watching the techniques of other carvers as they perform their art.  But, in my opinion, a written explanation and still photos is still the best way for someone to follow when trying to duplicate a tutorial.  It allows the student time to pause and study the process and each individual step.

I have received a few positive responses about the tutorials I have published from some wonderful people.  It pleases me greatly to know that someone has benefited from these small publications.  I love helping people.  Serving others is a source of true and lasting joy for me.  I do, however, have to ask myself, are there enough interested carvers out there to make producing more tutorials worth my while?  I value my time greatly since I work a full time job as a mechanical engineer, make and sell carving tools out in my small workshop on weekends to help make ends meet, have a large, young family with all of my children still at home, and am active in my church and community.  As you might suppose, I get very little leisure time, and what small amount of time I’m allotted, I want to get the most of.

I do not charge for access to my tutorials; some things in life should still be free.  A monetary value cannot be placed on the joy I get from helping someone over the hump of a carving question.  That feeling is far more valuable that a few extra dollars in my wallet.  I am willing to continue making new tutorials and taking my followers along in the passenger seat on my personal carving adventures, but only if there is enough interest for me to do so.

I would certainly appreciate it if you would leave a comment on this post or send me an email at theoldstump@live.com and let me know your feelings on the matter, so that I may make an informed decision.  If I find that there is still enough interest, I will revisit the Study Stick Tutorial and complete the other two steps, as well as look at some new subjects for future ones.  I will continue to post the progress on my personal carving adventures and take you along for the ride.  If not, that’s alright too.  I’ll dedicate my time to something else that is competing for my attention.  I will still keep the old tutorials available and post photos of my finished carvings to show them off to the world.

Thank you all for your interest in The Old Stump Blog.
Brandant Robinson

Friday, August 31, 2012

Four New 3/8" #9 Gouges

I spent some time out in my shop this week and was able to complete a few new gouges.  I have received some very positive feedback from those who purchased the first four, and I appreciate what they have said through emails and threads on the Woodcarving Illustrated forum.  Here are some pics of the next four:


The wood species are as follows from the top down: Olive, Walnut, Macassar Ebony, and African Mahogany.  They are turned out great.  I hope you like them and I will make them all available for purchase on the Knife Gallery page.
 
 
I have made very little progress on my dragon.  I hope to get some time on this three-day weekend to finish carving the small pieces of the scene and maybe start painting him.  I'll keep you all up to date on my progress.  Thanks for checking in.

Tuesday, August 21, 2012

My Little Dragon

Well, those four palm tools are going fast.  The frist three are already sold.  One sold within 30 minutes of putting in the Knife Gallery.  The thing that has surprised me the most is that the tool with the Honduras Rosewood handle hasn't sold yet.  In my eyes, it was the most beautiful of the four.  Oh well, I guess we all have our own unique tastes.

I suppose it’s about time that I show you folks the carving that has been occupying my time for the past several weeks.  I thought that I would try something completely different thatn anything I had ever seen done.  Here's what I came up with.


I was inspired by a piece of clipart that had a caricature dragon in it.

Tip from the Stump:  It’s amazing where inspiration for a carving can come from.  I get ideas from movies, photos, children’s books, and clipart.  Keep your mind open and a pencil handy to jot down the ideas as they come.

I didn’t have a block of wood big enough to carve the size of piece I wanted, so I ended gluing up several pieces to get a blank large enough to suit my needs.  The arms and head are attached and the tail is actually two segments glued together so that I could get the tip of the tail to wrap around and lay nicely over the foot.

He’s definitely a one of a kind original.  I think that’s why I enjoy carving medieval and fantasy caricatures so much; not many others are carving them.  Now all I need to do is put together a little scene to set this fellow off nicely.  I hope you like him.

Saturday, August 18, 2012

Four Palm Tools Available

Well, I decided that I would make a few of my new palm gouges that I have been making available available for purchase.  I have been having a great time making and using a set for myself, so I thought that I would spread the fun and sell a few.  Besides, I just purchased a new mini lathe in order to turn the handles and I need to pay for it somehow (wink, wink, nudge, nudge)!

I use O-1 high carbon tungsten-vanadium alloy tool steel that I harden and temper to approximately RC58 for the business end.  For the handle, I chose a variety of beautiful, exotic woods.  I had a great time exploring the artistic side of my brain by matching ferrules to the different woods.  The ferrules are made of copper that I use various techniques to give color and patina to the piece.  When all three pieces are assembles, it makes for a wonderful combination.  The best thing about them though, is how they glide through wood and make gorgeous little ribbons.  Now that's what I'm talking about!


The handles of the above pictured are as follows from top to bottom: Honduras Rosewood, Zebrawood, Wenge, and Padauk.  They turned out very striking indeed.  Go to my Knife Gallery page and scroll to the bottom to take a better look at each one with links to more photos, or to purchase your favorite one.  Happy Carving!!!

Thursday, July 26, 2012

Custom Orders Made Easy!!!

Hooray!!! 

I have finally figured out how to streamline my quality custom knife orders for my many and fantastic carving friends.  Before now, all custom order transactions were handled via email; often with several messages sent back and forth until the correct specifications for the order were made clear.  This occasionally resulted in a day or two of email tag and lengthened the time that my customers had to wait to received their custom knives.

Now, at the bottom of the "Knife Gallery" page (click the link at the top of this page to go there) you will find a Custom Knife Orders section.  This new section is outfitted with five drop-down menus for each aspect of the custom knife specifications and a convenient "Add to Cart" button for easy check out.  No more email ping pong and confusion!!!  The "Custom Orders" page is still available for help in making your custom knife decisions and, of course (sigh), if you still have questions you can reach me by email at:   theoldstump@live.com


I certainly hope that this new format will make custom knives more accessible to more people.  Ain't technology great!

Saturday, July 7, 2012

My Shop-Made Gouge


I've never been truly satisfied with any gouge that I have purchased from a commercial manufacturer.  I've owned tools from a variety of suppliers, but have had complaints about all of them.  Some of my concerns are: the grinds and flutes are off center, the blades are not mounted in the handle straight, ugly wood for the handle (you know my motto, "Don't carve with an Ugly Tool!"), low quality steel that doesn't take or hold an edge well, . . .   The list goes on and on.

Since I'm a knife maker, and know a thing or two about steel and making quality tools, I took it on as a challenge to make my own gouge.  I found a piece of drill rod made of O-1 High Carbon Tungsten-Vanadium Tool Steel.  Now that's what I'm talking about!  O-1 is perfect for a top quality tool.  It takes a razor edge and keeps holds it for a very long time.  I proceeded to forge the blade, hardened and tempered the steel to approximately 59HRC, filed the flute, shaped the heal and polished her up all nice and shiny like.

The one thing that is missing in my shop, the one tool that I covet, is a good lathe.  Even a bad lathe would be better than what I have.  But, me and my spindle and bench top belt sander get along great, so I solicited their help in shaping a suitable handle from a beautiful piece of black walnut.  I made my own ferrule from a 1/2" copper coupler which I trimmed off and rolled the front edge over.  With a little 5 minute epoxy, everything was fastened forever into place.  I wood burned the size and sweep onto the flat portion of the handle so that I can see it when it's upside down in my tool box. 


After the finish on the handle was dry, it was time to put it to the test.  OOOOOHHHH MY!  Now that's how a tool should feel.  It handles terrific and glides through end grain like it's cutting through hot butter.  After making a mountain of curly little shavings, I tested the blade on the hairs of my arm.  Let me just say that I need to wear my watch to cover up the bald spot.  That's how a tool should hold its edge.

I guess I've opened a can of worms.  Now I'm going to have to replace all of the gouges in my tool box with ones of my own making.  I think I'll make each handle from a different species of wood to make them as beautiful as they are functional, and maybe get a little fancy and creative with the ferrules.  I'll post photos of each as I get them made.  I guess that cowboy carving that I'm working on will have to wait for a little while.  I'm going back out to my workshop to play!


Who knows, maybe I'll like making these tools enough to sell them if there was enough interest.

Thursday, June 28, 2012

The King Gets His Colors

Well, here he is in all of his majesty.  The regal old monarch is full of attitude, but his eyes reflect the kindness with which he uses to rule his subjects.  I think I captured exactly what I was going for in this piece.  The crown was probably the funnest part to make.  It's made out of a piece of copper flashing cut out and soldered together.  The studded jewels are the heads off of some round brads that were soldered into place as well.  I set it on his head in a dapper, slightly-ascue fashion that I think gives this piece some real character.


There are many more photographs on the Carvings Gallery Page if you care to stop in and have a better look.  I would love to know what you think, so please leave a comment or send me an email.  Thanks for dropping by.

Saturday, June 23, 2012

My Weeks Work

I spent some time out in my shop this week and here's a picture of the fruits of my labors:


Starting at the top and going clockwise, the woods are black walnut, ash, cocobolo, Hawaiian toon, spalted maple, mahogany, flame figured box elder, and Osage orange.  The blades are and assortment of detail, all-purpose, and rough-out styles.  All eight of them turned out beautifully and all are available for purchase on the Knife Gallery Page if you see something that sparks your interest.

Friday, June 15, 2012

A King is Born

I finished up the carving portion of the torso for the King last night.  I still need to give the fur around the neck some texture with my Dremel to top it off.  I'll try to get that accomplished over this busy weekend.  I also need to give the king a crown and some bling to make him look royal.


I'd love to know what you think so far, so pleas leave a comment or drop me an email.  Thanks for looking.

Monday, June 4, 2012

The King's Head

As most of you know, I have an ongoing theme of Medieval Busts that I have been carving for the last two years or so.  When I was remodeling the Carvings Gallery Page last week, I realized that I had omitted the most important figure from the court.  The King!  Well, I just had to do something about that.  I went out in my shop and found that the piece of Quaking Aspen (Populus Temuloides) that I have had drying since last year was ready to go.  This is a fantastic wood for those of us out here in the mountains of the far west.  It carves very much like basswood and I can get a whole pickup truck load for about the same price as I can have a two-foot-square box of Minnesota basswood shipped to me.  I carved “The Sheriff” out of aspen and he turned out great, so I thought I would give it a try for my King.

Here is what I have done so far.


I really wanted to give him a strong, majestic jaw line and I believe I achieved my goal.  This smiling old monarch should look great standing next to his frowning, uptight queen.  It still needs a little sanding and some woodburning to highlight the deepest recesses and provide a boarder for when he gets painted.  I hope to get started on the torso portion of the bust tonight, and I promise to make regular posts of the progress I’m making, so check back soon.

Thursday, May 31, 2012

I'm Back!!!


Wow!  Has it really been that long since I've posted?  I can’t believe you all are still hanging around here, but, I’m glad that you are.  I offer a +huge thank you to all of The Old Stump supporters out there.

Now that the baby is starting to sleep a little better at night and the remodel work on my girls’ bedroom is finished, I’m ready to get back to some serious carving and knife making.  As you may have noticed, I have made a few improvements to The Old Stump Blog.  If you look up at the top of this page at the page list, you will see the addition of two new pages and the deletion of two others. 

First of all, the Carving Bench page was removed from the Blog.  I hardly ever posted any pictures there since I usually posted them here on the Home page.  I also removed the Picture Gallery page.  Now, don’t worry about not being able to view my finished carvings.  All I really did was improve the page with bigger pictures, added descriptions of each piece, provided better links to more photographs of my carvings, and changed the name to Carving Gallery.  I hope you will stop by and have a new look.  I wouldn’t mind if you purchased a carving or two either as I’m quickly running out of shelf space to display them and would much rather send them off to a new home where they can be appreciated.

The second page that I added was a Custom Orders page.  My hope is that this page will be “the” place to go for ordering a custom carving knife to your own specifications.  It shows examples of the different blades and handles available and gives an in-depth description of each.  There is also a cost breakdown available showing the prices for the different styles of knives.  All knives fall between the $30.00 and $40.00 mark and will be made to your own specifications.

Now, it’s time to get out the toolbox, strop a few knives and start making some chips.  Once again, thank you to everyone for your patience and the support that you give me and The Old Stump Blog.

Saturday, April 14, 2012

A New Knight

I know, I know!  It's about time that I get around to posting something.  I've been so busy with our new baby, remodeling our house, and a half dozen other things that I haven't had time to sleep, let alone post anything.  In fact, I have the baby in my arms right now and trying to type with only one hand.  Kind of slow going! 

Thanks for sticking with me and not running off to someone else's blog.  I'm also down to only one knife available for purchase in the Knife Gallery.  MAN I'M BEHIND!!!  I promise to spend some time next week and get a few more made.  I just got in a shipment of some really beautiful wood, so the handles from the next batch should be something spectacular.

I hope to get more time to do some serious carving soon.  In the mean time, here's a little project that I've started working on.


I thought that I would have some fun and carve another knight.  The face turned out really nice.  He has kind of cocky grin, like a knight would have while looking down on the peasants.  I've just started roughing out the body, so not much to see there.  I thought that I would make him kind of short and skinny and give him a really big shield and maybe a spear or polearm, something tall to accentuate his small stature.  I'll trick him out with some other addons so he looks snappy.  He should be a handsome fellow if he works out like I hope.

Thanks again for sticking with me.  Here are a few more pics of the head.


Tuesday, March 13, 2012

Cooling His Heels Completed!!!

The long journey finally came to an end this weekend, and I finished my scene.  I know that I've said this before, but it turned out better than I had hoped. 


I think I achieved that relaxed look on my cowboy's face that I was hoping for, and you can almost see the steam coming off of his heels as he soaks them in the stream.  The two vacationing amphibians really adds charm and the overall design.  The frog floating in the inner tube is my favorite part of the whole scene.  I really wanted to get a cowboy hat into the piece, but it just didn't fit in without covering up more important details.  So, I gave up the idea and really don't feel the lack.

As promised, let me describe my struggles with developing the water.  My original goal was to make the water clear so that the bottom of the stream could be seen as well as the moss hanging off of the bottom of the log that the cowboy is sitting on.  I explored several options from epoxy to railroad modeling stuff.  I finally decided to try a product from Woodland Scenics called E-Z Water.  It's a plastic material that comes in small pellets.  I heated up a batch on the stove and pored it into the channel.  Right away, I could see that it was going to be a cloudy amber color.  Oh well, it was too late to change my mind.  So, I forged forward, building up the water in several layers.  Once I reached the depth that I was looking for, I used an old paint brush to texture the surface.


Once I was satisfied, I let the thing dry for a few hours and assessed the situation.  The top surface was really not to my liking.  It was too rough and really didn't have the look that I wanted.  There were a few places where the top layer was pealing off, so I took a piece of dowel cut off at a bevel and scraped at the surface of the E-Z Water.  It chipped off very easily, and what I found underneath was a nice, flowing texture.  Eureka!  That's what I was looking for.
Now that my idea of a clear stream was shattered, I was forced to resort to painting the water's surface.  I painted the entire surface with a True Blue color for an undercoat.  I followed up with a second layer of Turquoise on the higher points, leaving the lower sections the darker blue.  I finished up by dry brushing the tops of the waves with white to accent the white caps that my frog is enjoying.  All in all, I'm quite pleased with the results.  Even with the paint, the water is still somewhat translucent and provides a nice effect.

I'm not sure that I would recommend the E-Z Water yet.  I'll probably try another project with it before I make up my mind.


I learned many lessons along this journey.  Some for the good, some things to improve on.  That's exactly what carving is all about.  One should learn from each piece carved and apply the new knowledge to the next.  I hope you have enjoyed this series and learned something for yourself along the way.  Thanks for tagging along.

There are a lot more photos in the Picture Gallery, and the piece is available for purchase.  If you are interested, just drop me an email.